
Configure room layout zones information
This feature is supported by HDL300, Dual HDL300, HDL310, HDL410, and HDX systems.
This tutorial shows how to configure the zones layout for the room where Nureva® audio devices are located.
What is a zone?
A zone is an area within a room. There are two types of zones: camera zones and active zones.
Camera zones
Camera zones are only supported by HDL310, HDL410 and HDX devices.
Defining camera zones allows you to trigger events when sound is detected within a zone. For example, you can set up a meeting room system to select a particular camera angle when a particular camera zone is triggered.
How to configure zones in Nureva Console
The sound location data stream endpoint will return zone data when any zones are triggered. Learn more about triggered zones
In the example room below, the presenter stands at the front of the room while the audience comprises the remainder of the room. Employing zones in this room allows one camera to be focused on the presenter while a second camera points at the audience. During a meeting, the appropriate camera view can be selected based on whether sound is currently detected in the presenter zone versus in the audience zone.

For HDL310 and HDL410 devices, a maximum of eight camera zones can be created in each room, and for HDX devices, a maximum of sixteen camera zones can be created in each room. Camera zones can be positioned outside of the configured room dimensions, however, the zones cannot overlap.
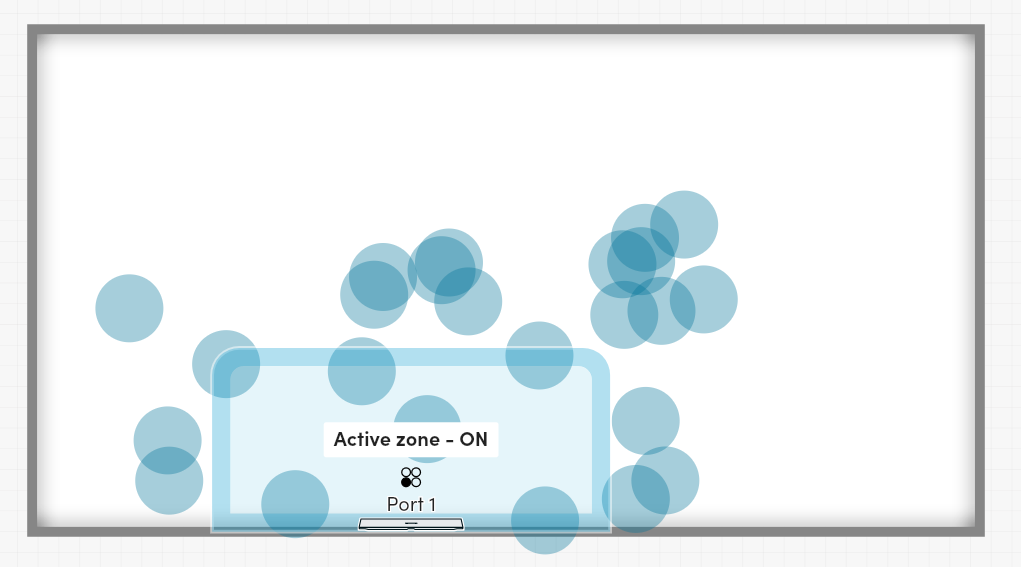
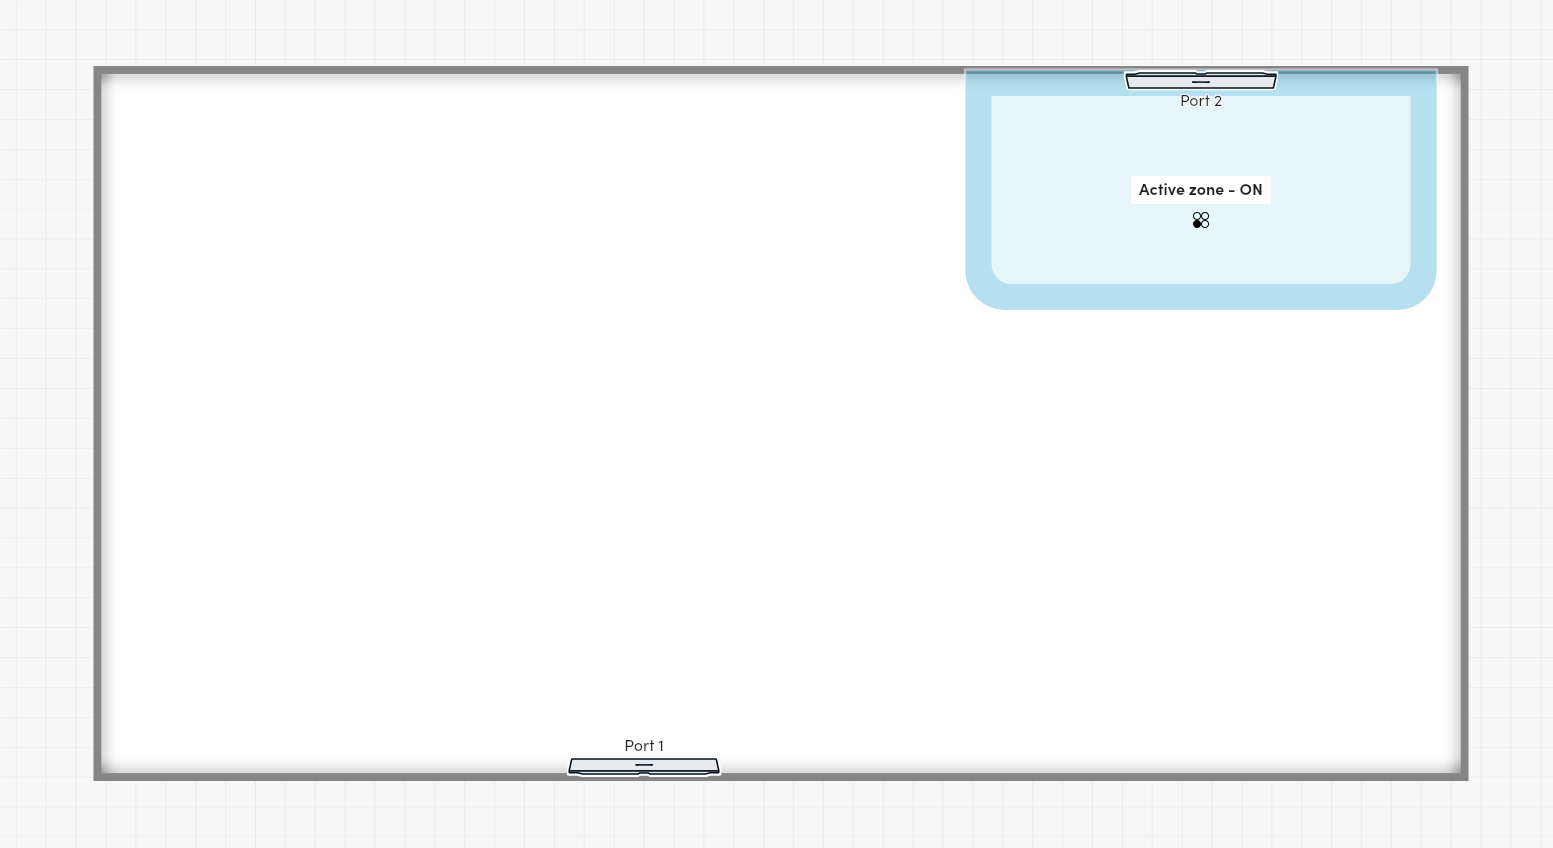
Active zones
Active zones are only supported by HDL300 and Dual HDL300 devices.
Defining an active zone allows you to only get audio pickup for remote participants in that particular zone. For example, the room could be configured such that only the audio surrounding a particular speaker is picked up for remote participants.
As the examples below depict, there can only be one active zone per room and the active zone must be attached to an audio component. One of the edges of the active zone is lined up with the audio component and the zone is centered on that edge.
Zone position
All zones are rectangular. Zone position is defined by two points:
- point1 gives the (x, y) coordinate of one corner of the zone's bounding box, in millimeters
- point2 gives the (x, y) coordinate of the opposite corner of the zone's bounding box, in millimeters
The same coordinate system is used for audio component positions, zone positions and sound location data. Refer to the coordinate system diagram in the Start Device Data Stream tutorial. The origin is defined as the center back of the primary audio component.
When interpreting the zone position coordinates, (0,0) represents the center back of the primary audio component. Positive x values are in the east direction. Positive y values are in the north direction.
The primary audio component will always be oriented to be facing away from the south wall of the room layout.
What zone information is available?
Each zone has a type, an on or off status, a position (geometry), a label, and a unique ID.
| type | A string defining the purpose of this zone. There are two possible values for this field, "Switching" and "Active". "Switching" indicates that the zone is a camera zone intended to define support for camera switching within this room. "Active" indicates that the zone is an active zone intended to define support for active zone control within this room. |
| activeZoneControl | This field is only available for zones with the type "Active". This value is a string that indicates which audio component the active zone is attached to. For an HDL300 device, the value of activeZoneControl will always be "AUDIO_BAR_0". For a Dual HDL300 device, there are two possible values, "AUDIO_BAR_0" and "AUDIO_BAR_1". |
| on | A boolean that indicates if the zone is on. Camera zones are always on. If the room's active zone is on, then only audio detected within the zone will get picked up. If the room's active zone is off, then all audio within the room will get picked up. |
| geometry | Position of the zone defined by a set of coordinates where the center back of the primary audio component is the origin (0,0) of the coordinate system. All zones are rectangular or square with their bounding box defined by the point1 and point2 properties on opposite corners.
|
| label | The label given to the zone. |
| id | A unique identifier. |
What can be controlled with the API?
Zones can be added, modified, and removed by configuring the zones within the list zones.
- zones: The list of configured zones in the room. Each zone is defined by the following attributes:
type: The zone type. Possible values are"Switching"and"Active". A value of"Switching"indicates that the zone is a camera zone, and a value of"Active"indicates that the zone is an active zone.activeZoneControl: This property can only be configured for active zones. It describes the audio bar the zone is attached to. For Dual HDL300 devices, possible values are"AUDIO_BAR_0"for the primary audio component, and"AUDIO_BAR_1"for the secondary audio component. For HDL300 devices, the only possible value is"AUDIO_BAR_0".on: A boolean representing whether or not the zone is on. This value can be configured for active zones, but camera zones must always be on.geometry: The position of the zone defined by two coordinates,point1andpoint2. The attributespoint1andpoint2represent the opposite corners of the rectangular or square zone.point1: Thexandylocation of one corner of the zone's bounding box in millimeters.point2: Thexandylocation of the opposite corner of the zone's bounding box in millimeters.
label: The label given to the zone.id: The unique identifier of the zone.
Validations
HDL300 and Dual HDL300
- HDL300 and Dual HDL300 devices only support active zones.
- One of the edges of the active zone must be lined up with an audio component, and the audio component must be centered on that edge.
- Only one active zone is supported.
- The minimum allowed size for an active zone is 8ft by 8ft.
- The maximum allowed size for an active zone is 25ft by 25ft.
HDL310
- HDL310 devices only support camera zones.
- Camera zones can be positioned outside of the configured room dimensions, however, the zones cannot overlap.
- For HDL310 devices, a maximum of eight camera zones can be created in each room.
- For HDL310 devices, the minimum size of a camera zone is 8ft by 8ft.
- Camera zones cannot be turned off.
HDL410
- HDL410 devices only support camera zones.
- Camera zones can be positioned outside of the configured room dimensions, however, the zones cannot overlap.
- For HDL410 devices, a maximum of eight camera zones can be created in each room.
- For HDL410 devices, the minimum size of a camera zone is 8ft by 8ft.
- Camera zones cannot be turned off.
HDX
- HDX devices only support camera zones.
- Camera zones can be positioned outside of the configured room dimensions, however, the zones cannot overlap.
- For HDX devices, a maximum of sixteen camera zones can be created in each room.
- For HDX devices, the minimum size of a camera zone is 1m by 1m.
- Camera zones cannot be turned off.
admin role required
admin role requiredThe Get room layout endpoint can be accessed with the general role or any role of a higher level.
The Set room layout endpoint is restricted to the admin role. To access this endpoint, follow the Authorization tutorial to authenticate with an admin role and obtain YOUR_ADMIN_AUTHPARAMETERS which is required for the requests below.
Overview
- Use the Get room layout endpoint to get the current zones configuration.
- Use the Set room layout endpoint to make a request to change the zones configuration.
- Use the Get room layout endpoint to check that the change has been applied successfully.
Instructions
Step 1 - Make a request to get the current zones configuration
Use the Get room layout endpoint:
- Set the path with the IP address of the Nureva® device followed by
/api/v1/room/layout. - Update the headers to include
Authorizationas key and the value beingNurevafollowed by theauthParametersreceived from the login endpoint. - Update the headers to include
Nureva-Client-Idas key andintegration_app_nameas the value. - Update the headers to include
Nureva-Client-Versionas key and0.0.1as the value. - Send the GET request. The code sample below is a request to retrieve the zones configuration of the room of the device with the IP address of
10.0.0.1.
curl --request GET \
     --url https://10.0.0.1/api/v1/room/layout \
     --header 'Authorization: Nureva <YOUR_ADMIN_AUTHPARAMETERS>' \
     --header 'Nureva-Client-Id: integration_app_name' \
--header 'Nureva-Client-Version: 0.0.1'- If the call is successful, an HTTP status code of 200 OK will be returned.
Step 2 - Make a request to update the zones configuration
Use the Set room layout endpoint:
- Set the path with the IP address of the Nureva® device followed by
/api/v1/room/layout. - Update the headers to include
Authorizationas key and the value beingNurevafollowed by theauthParametersreceived from the login endpoint. - Update the headers to include
Nureva-Client-Idas key andintegration_app_nameas the value. - Update the headers to include
Nureva-Client-Versionas key and0.0.1as the value. - Update the headers to include
Content-typeas key andapplication/jsonas value. - Update the request body to send a JSON object with updated zones information
curl --request PATCH \
     --url https://10.0.0.1/api/v1/room/layout \
     --header 'Authorization: Nureva <YOUR_ADMIN_AUTHPARAMETERS>' \
     --header 'Nureva-Client-Id: integration_app_name' \
     --header 'Nureva-Client-Version: 0.0.1'\
     --header 'Content-type: application/json' \
--data '{"zones": [{"type": "Switching","on": true,"geometry": {"point1": {"x": -1680,"y": 55},"point2": {"x": 2500,"y": 3729}},"label": "Camera Zone 1","id": "898f31e7-f72c-478f-ba62-4c7a058e7081"}]}'- Send the PATCH request.
- If the call is successful, an HTTP status code of 200 OK will be returned.
Step 3 - Check that the change has been applied successfully
Use the Get room layout endpoint:
- Set the path with the IP address of the Nureva® device followed by
/api/v1/room/layout. - Update the headers to include
Authorizationas key and the value beingNurevafollowed by theauthParametersreceived from the login endpoint. - Update the headers to include
Nureva-Client-Idas key andintegration_app_nameas the value. - Update the headers to include
Nureva-Client-Versionas key and0.0.1as the value. - Send the GET request. The code sample below is a request to retrieve the zones configuration of the room of the device with the IP address of
10.0.0.1.
curl --request GET \
     --url https://10.0.0.1/api/v1/room/layout \
     --header 'Authorization: Nureva <YOUR_ADMIN_AUTHPARAMETERS>' \
     --header 'Nureva-Client-Id: integration_app_name' \
--header 'Nureva-Client-Version: 0.0.1'- If the call is successful, an HTTP status code of 200 OK will be returned.
- Check that the value of
zonesmatches thezonessent in step 2.
The example below indicates that the change was successfully applied, for the PATCH call in step 2.
{
  "zones": [
    {
      "type": "Switching",
      "on": true,
      "geometry": {
        "point1": {
          "x": -1680,
          "y": 55
        },
        "point2": {
          "x": 2500,
          "y": 3729
        }
      },
      "label": "Camera Zone 1",
      "id": "898f31e7-f72c-478f-ba62-4c7a058e7081"
    }
  ]
}
Tutorial complete!You now know how to configure the zones configuration information.